FunFact: Remix doesn't mean to mixing/modifiying a song only, It is also an IDE to write smart contract on Ethereum (Ethereum based blockchain) :smiley:
What is an IDE & why it exists ?
IDE stands for Integrated Development Environemnt. Any IDE is basically a collection of tools to write, test, and debug a code. An IDE can be generic (supports many programming language) or it can be specific.
Even without using an IDE, you could write the code and test it BUT here are few advantages that comes along with an IDE
- You get a Text editor (code editor) to write your program : Integrated in the same environment
- A debugger : to save your from nightmares of what's breaking your code
- A compiler : Inherited from OS or inbuilt sometime : to provide you the machine code
a few examples : VS Code, Jupyter Lab, PyCharm, Remix, Anaconda .. and many others
I hope you got an !dea of an IDE.
Remix IDE
- Remix is a powerful open source IDE that allows you to write smart contracts in Solidity programming langauge.
- Remix is used for smart contract development as well as acts as a playground for learning and teaching Ethereum.
- Remix IDE has modules for testing, debugging and deploying of smart contracts and much more.
Remix IDE is available both online (as a web-app in the browser) as well as offilne (standard installation for all major OS)
Online Remix IDE
You can directly access online IDE from remix.ethereum.org , without the need to login. This Web-app version is most popular and widely used Remix IDE. In the subsequent sections, you will learn various components of online version of Remix and get started with it.
Offline Remix IDE
Offline version (installable) of Remix IDE is also available for the use and you can always get the latest release for all major OS type from HERE
Remix UI walkaround (Online version)
This is the default (theme may vary based on your mode preference) web-app view for online Remix IDE.
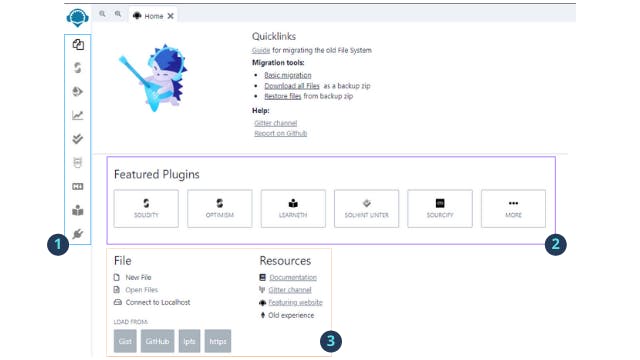
There are three major categories of items
- Remix Sidebar
- Featured Plugins
- File & Resources
1. Sidebar
The sidebar usually contains several icons but predominantly it has first three of them, which are
File explorer: Browse, locate, arrange, create files and foldersCompile: To compile a smart contract & generate the necessary filesDeploy: Deploy smart contract on either a simulated or testnet , or a mainnet blockchain
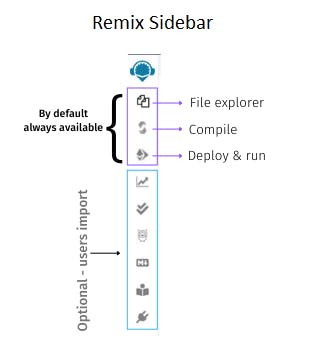
Remaining icons that you see in the above image are manually installed using the featured plugin section. At any point of time , you can remove them or add a few more icon based on your requirement. The expanded view for all these three icons is collated at one place as shown in the image (appearing in the next section).
Expanded view of all Three buttons
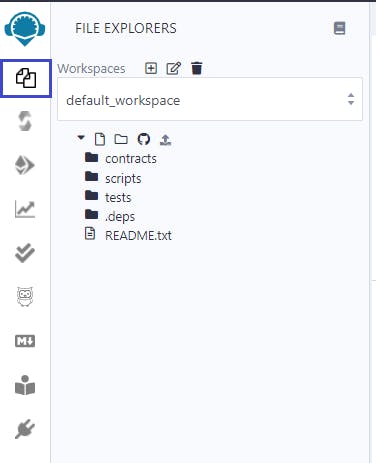
File Explorer
As the name suggest, it helps you organize your files and folder in the workspace. Workspace is just an organized area having your default files and setting saved. You can create multiple workspace and organize your content in varied way in each of them. From the image shown below, it is pretty obvious that you can create a file, folder, push all these code on Github Gist and you can load file(s) from your local system. It also allows you to delete a file or folder or even workspace.
Solidity Compiler
The 2nd tab is Solidity Compiler, it basically provide you with various option to be set for code compitaion such as compiler version, language, EVM type/version, and a few more fucntions. Normally, you don't have to choose the version of solidity compiler manually, as it would be picked from the code itself in the pragma line and correct version gets automatically selected.
pragma solidity ^x.y.z;
Let the language be selected as Solidity and EVM compiler version compiler default would be best fit for beginners (untill and unless you want a specific version).
Auto Compile feature helps you to automatically keeps on compiling every time you make any changes to your code (either add or delete). You can choose not to autocompile every time by simply unchecking the corresponding box. I prefer to keep it ON, as it acts like a helper and put me confident of my work BUT sometime I prefer to keep it OFF. You can decide your own. You can enable optimization, the optimizer tries to simplify complicated expressions, which reduces both code size and execution cost (don't worry - if you did not understand .. it is an advance topic).
After all the settings in place - You can hit compile 'name_of_project.sol'. There could be more than one contracts in your solidity code and you can select the one that you want to compile (more on this in Intermediate section..).
It would compile and generate two files, which are required during the deployment.
- ABI
- Bytecode
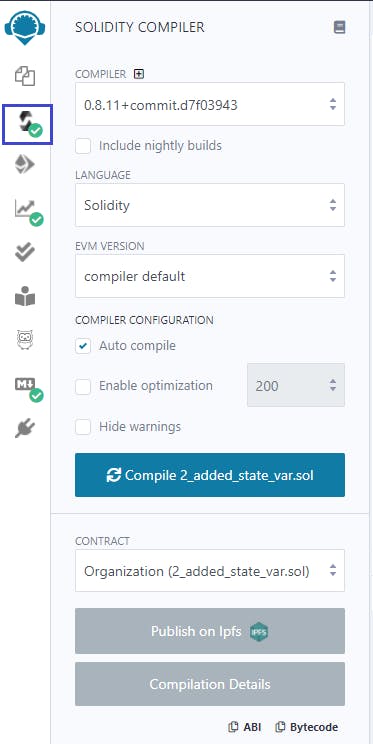
After compilation, you would also see two json files, which are; 1. name-of-contract.json and 2. name-of-contract_metadata.json, created inside contracts/artifacts/ and can be explored using file explorer.
Deploy & Run
This section helps you to deploy the Smart Contract on a selected blockchain. Environment is the first option; it ask you to choose the target where you want to deploy the smart contract and upon clicking the dropdown you would see the following option.
- JavaScript VM (London) : Temporarily sandbox blockchain in the browser, reload will reset everything
- JavaScript VM (Berlin) : Same as above
- Injected Web3 : Remix will connect to an injected web3 provider, such as
metamask - Web3 Providers : Remix will connect to an injected web3 provider using the URL provided (e.g from INFURA)
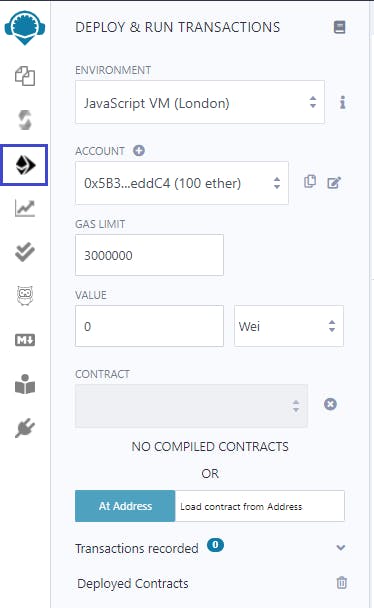
Based on the Environment selection, an account would be visible with the some tokens. For VM's, by default there are 15 accounts and each having 100 ethers (it's a fake ether, so don't get overwhelmed 😆..) and the tokens for other selection would be fetched from respetive sources. Let the Gas Limit as it is 3000000, this sets the maximum amount of gas (3000000 wei) that will be allowed for all the transactions created in Remix. The value section sets the amount of ETH, WEI, GWEI etc that is to be sent to a contract.
Next click on the Deploy button; it sends a transaction that deploys the selected contract on the connected blockchain. It works instantly if VM is selected as environemnt otherwise takes some time to deploy the contract on the blockchain. After the contract is deployed, you can interact with them using autogenerated UI. We will see it in later section.
2. Featured Plugin
This section has list of various plugin supported by online Remix IDE. You can click on the last icon more..., it will open up a Plugin Manager in the left side. Now you can select any plugin to install or uninstall an existing plugin. The sequence of plugins keeps on changing , so don't worry about it. You can also search the plugin or connect a local plugin.

3. File & Resources
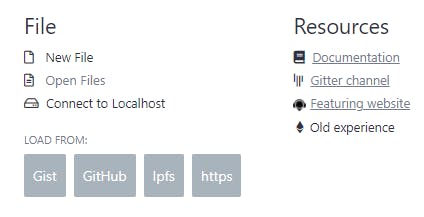
This is just a additional help section to keep most commonly used operations together. Open an existing file from your system, connect to a localhost.
somehow
New Filefunction to create a file is not working. There are list of resources such as blogs, official post, documentation etc...
At the bottom, you can see 4 buttons namely Gist, GitHub, Ipfs, https -> This allow you to load files/code from these sources directly to the current workspace.
I hope you like the content and this post is primarly focusing Beginners starting out to explore Solidity programming language. This will help you to understand the user interface in best possible way and get started with writting solidity code and deploy on any target instance.
